
In this tutorial, we will go through installing and configuring Amazon Web Service’s Command Line Interface (AWS CLI) on Apple Mac OS. First part is to install the AWS CLI and its prerequisites. Second part is to configure the AWS CLI to properly connect to your AWS account.
- Installation (Part 1)
- Configuration (Part 2)
- Configure command
- Named Profile
- Environment Variables
- Configuration Precedence
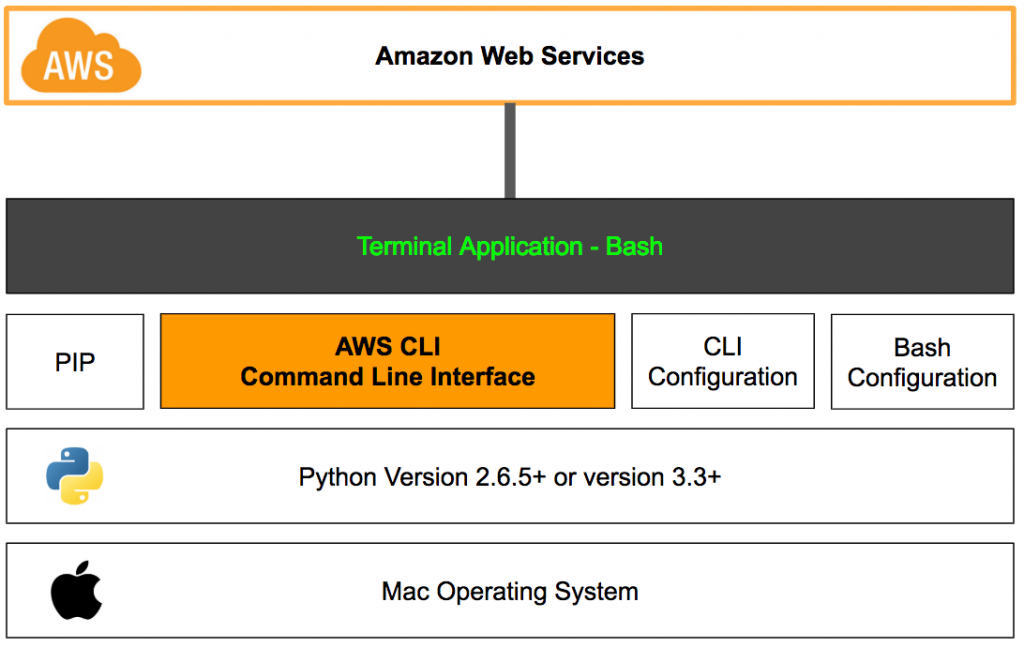
Architecture
There are several components related to AWS CLI. We’ll go through each components in order to make sure AWS CLI is working properly on your MacOS. This tutorial assumes that you are installing on a MacOS.
At high level, AWS CLI is a Python based application that securely communicates with resources in the AWS. PIP is package installation software used to install AWS CLI. The terminal application is already installed on your MacOS and is primary interface for you to issue AWS commands. There are several configuration files (CLI and Bash) to set values so that CLI will work properly. We’ll go over each components in detail. Refer to below diagram to understand the overall architecture.
Step 1 – Python
First step is to make sure you have required version of Python installed on your computer. As of this writing, AWS CLI requires Python 2 version 2.6.5 or higher or Python 3 version 3.3 or higher.
Check Python Version
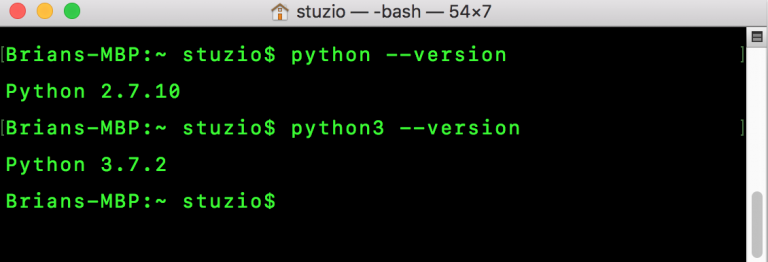
- Open a new terminal application (goto Launchpad – Other – Terminal).
- Type python ––version
- Type
- Look at the response and see if your python 2 version is equal to or higher than 2.6.5
- Type python3 ––version
- Look at the response and see if your python 3 version is equal to or higher than 3.3.
If you have proper version of Python already installed on your computer, then you can skip to Step 2 – PIP. Otherwise, follow the next section to install Python.
Install Python
If you don’t have Python installed or your version is lower than required for AWS CLI, then follow these steps to install Python.
- Open a browser and navigate to python.org
- Navigate to Download and download the latest version of Python installer for MacOS.
- Run the installer and follow the wizard instruction.
- Open Terminal Application
- Type python3 ––version
- You should see response with version you installed.
Step 2 – PIP
PIP is a popular Python package installation software that we’ll use to install the AWS CLI. In this step, we’ll check to see if you have PIP installed.
Check PIP version
- Open a Terminal application
- Type pip ––version or pip3 ––version
- Look at the response of installed pip program.
If you pip installed, then you can skip to Step 3 – AWS CLI. Otherwise, follow the next section to install pip.
Install PIP
Follow these steps to install PIP.
- Open Terminal application
- Navigate to folder where you want to download the PIP installation program (use ls to list the directory, cd to change directory)
- Download the pip installation file using curl command.
- curl -O https://bootstrap.pypa.io/get-pip.py
- The -O option tells the curl command to download to a file. The file named get-pip.py will be download.
- Install the program using python or python3 depending on your version of python.
- python3 get-pip.py ––user
- Note that if you don’t have python3, then you can use command python get-pip.py ––user
- The ––user option installs the PIP program for current user on MacOS. If you omit this option, then PIP will be installed globally for all users on your MacOS.
- Type pip ––version or pip3 ––version
- You should see response with PIP version you installed.
PIP Troubleshooting (optional)
After installing PIP, you may still not get a proper response when you type pip ––version or pip3 ––version. One possible issue is that your computer does not have correct path variable set for the PIP program. Follow these steps to troubleshoot path variable issues.
- Open Terminal application
- Type echo $PATH and look for path to where the PIP program is installed.
- If you are not sure where PIP program is installed on your computer, check one of the following paths
- Option A – user local path
- If you used python get-pip.py ––user option to install PIP, then it’s probably installed on your home directory’s sub folder under Library
- Navigate to your home directory (type $HOME to find out your home directory).
- Navigate to sub-directory under home /Library/Python/3.7/bin. You may see different version than 3.7 on your machine. Note if you are using finder, you may not see all of the hidden folders. Press Shift Command . (period) keys at same time to display hidden file
- Look for pip or pip3 program file.
- If this is your path for pip program, then add the path variable to your terminal session. Note your user name and version 3.7 may be different
- Type (set username and version to your values) export PATH=$PATH:/Users/username/Library/Python/3.7/bin
- Option B – Global path
- If you used python get-pip.py without the ––user option to install PIP, then it’s probably installed global path.
- Navigate to your root directory (i.e. Macintosh HD). Be sure to have hidden file display by pressing Shift Command . (period) keys at same time if you are using Finder.
- Navigate to /Library/Frameworks/Python.framework/Version/3.7/bin. You may see different version than 3.7 on your machine.
- Look for pip or pip3 program file.
- If this is your path for pip program, then add the path variable to your terminal session. Note your version 3.7 may be different
- Type (set version to your values) export PATH=$PATH/Library/Frameworks/Python.framework/Versions/3.7/bin
- Type pip ––version or pip3 ––version
- You should see response with PIP version you installed.
- If you want to permanently add this path your computer, you can add the path to your .bash_profile file. See next section on how to set environment variables using .bash_profile.
Step 3 – AWS CLI
Now that both Python and PIP are installed, it’s time to install the AWS CLI itself.
- Open Terminal application
- Type pip3 install awscli ––user
- Note, the ––user option instructs PIP to install the AWS CLI for current logged in MacOS user only (vs. all users)
- Type aws ––version
- AWS CLI responds with installed version number. Congratulation, you have successfully installed AWS CLI.
AWS CLI Troubleshooting (optional)
After installing AWS CLI, you may still not get a proper response when you issue aws ––version. One possible issue is that your computer does not have correct $PATH environment variable set for the AWS CLI program. Follow these steps to troubleshoot path variable issues.
- Open Terminal application
- Type echo $PATH and look for path to where the AWS CLI program is installed. Note each value in the $PATH variable is separated by colon (:).
- If you are not sure where AWS CLI program is installed on your computer, check one of the following paths
- Option A – user local path
- If you used pip3 install awscli ––user option to install AWS CLI, then it’s probably installed on your home directory’s sub folder under Library
- Navigate to your home directory (type $HOME to find out your home directory).
- Navigate to sub-directory under home /Library/Python/3.7/bin. You may see different version than 3.7 on your machine. Note if you are using finder, you may not see all of the hidden folders. Press Shift Command . (period) keys at same time to display hidden file
- Look for aws program file.
- If this is your path for AWS CLI program, then add the path variable to your terminal session. Note your user name and version 3.7 may be different
- Type (modify username and version to your values) export PATH=$PATH:/Users/username/Library/Python/3.7/bin
- Option B – Global path
- If you used pip3 install awscli without the ––user option to install AWS CLI, then it’s probably installed global path.
- Navigate to your root directory (i.e. Macintosh HD). Be sure to have hidden file display by pressing Shift Command . (period) keys at same time if you are using Finder.
- Navigate to /Library/Frameworks/Python.framework/Version/3.7/bin. You may see different version than 3.7 on your machine.
- Look for aws program file.
- If this is your path for AWS CLI program, then add the path variable to your terminal session. Note your version 3.7 may be different
- Type (set version to your values) export PATH=$PATH:/Library/Frameworks/Python.framework/Versions/3.7/bin
- Type aws ––version
- You should see response with AWS CLI version you installed.
Set AWS CLI Path to .bash_profile
If you plan to use AWS CLI often, it’s more convenient to set the path variable permanently on you computer so you don’t have to type the export PATH command each time you open a new Terminal application. Instead, you can use the .bash_profile file to set the $PATH environment value. This way, each time you open a new Terminal application, the commands in the .bash_profile file gets executed and set the appropriate environment values for every session.
- Find .bash_profile file on your computer. This file is located in your user’s home directory. Note that this file is hidden file type and may not display by default on your computer.
- If you are using Terminal application, type cd $HOME to go to your home directory. Then type ls -a to list all items including hidden files.
- If you are using Finder, navigate to your user home directory and press shift command . (period) keys at same time to toggle to display hidden items.
- You should see .bash_profile file. If you don’t see this file, you can create one.
- (optional) Create a new .bash_profile file (only if you don’t already have one)
- Open Terminal application and navigate to. home directory by typing cd $HOME
- Type nano .bash_profile This command opens a text editor
- Press control x keys to exit and type Y to save the file. This action creates a blank .bash_profile file.
- Open .bash_profile file from Finder. This opens up a TextEdit program.
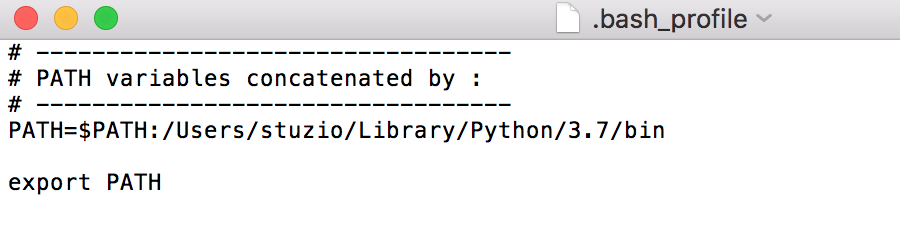
- Type the path to your AWS CLI program you discovered in previous section AWS CLI Troubleshooting.
- Example – path for local user install. Note the user name stuzio should be replaced with your MacOS user name and python version number path may be different on your computer.
- PATH=$PATH:/Users/stuzio/Library/Python/3.7/bin
- export PATH
- Example – path for global install. Note the Python version path number 3.7 may be different on your computer.
- PATH=$PATH:/Library/Frameworks/Python.framework/Versions/3.7/bin
- export PATH
- If you already have path variable with values set on your .bash_profile, you can just append the new value by adding a colon (:) then your new path value. If you already have export PATH command in the file then you don’t need to add it again.
-
Example of .bash_profile with path value appended to existing $PATH variable.
- Example – path for local user install. Note the user name stuzio should be replaced with your MacOS user name and python version number path may be different on your computer.
- Save the .bash_profile file.
- Close the Terminal application and reopen it. The new Terminal application will be initialized with commands in the .bash_profile file.
- Type echo $PATH to see the current path values in the session. You should see the new path that contains the AWS CLI program as one of the path values.
- Type aws ––version
- You should see response with AWS CLI installed version number. Notice that every time you open the Terminal application, the AWS CLI path value will be set automatically for you eliminating need to type export command each session.
Summary
AWS CLI installation requires specified version of Python. You can check the Python version and optionally install it if needed. This tutorial used PIP package installation program to install the AWS CLI. You use the bash based Terminal application to use the AWS CLI program. You can troubleshoot installation by checking the $PATH variable and set it either on the Terminal application session or on .bash_profile file. You can verify that AWS CLI is installed correctly on your computer by typing aws ––version command.
In the second part of this tutorial, we’ll go over configuring the AWS CLI to connect to your AWS account and look at some AWS CLI command to work with resources in the account such as S3.